A pressure reducing valve is a small but mighty device that sits on your main water line. Its main job is to slow down the high-pressure water coming from the city pipes before it hits your home’s faucets and toilets. Think of it like a security guard for your plumbing. Without a pressure reducing valve for home use, your pipes could rattle, leak, or even burst because the water is pushing too hard. Most cities send water at very high speeds to reach everyone, but your dishwasher and water heater prefer a much gentler flow.
Having a water pressure reducing valve installed means you are taking control of your utility costs and safety. High pressure can waste thousands of gallons of water every year by forcing more liquid through the tap than you actually need. When you install a 3/4 pressure reducing valve (the most common size for houses), you protect your expensive appliances from wearing out too fast. It is one of the smartest investments a homeowner can make to ensure a quiet, leak-free environment for years to come.
Table of Contents
How Does a Pressure Reducing Valve Work?
You might wonder, how does a pressure reducing valve work without using any electricity? It actually uses a clever system of springs and a rubber diaphragm. When water enters the valve, it hits a spring-loaded chamber. If the water is pushing too hard, the spring pushes back and narrows the opening. This physics trick slows the water down to a safe level. A watts pressure reducing valve or a caleffi pressure reducing valve are great examples of brands that use this reliable mechanical design to keep your home safe.
If you look at a pressure reducing valve symbol on a blueprint, it looks like a diamond with arrows. This shows that the energy is being managed. People often ask, how does a water pressure reducing valve work when everyone in the house turns on the shower at once? The valve senses the drop in pressure and opens up slightly more to keep the flow steady. It is constantly moving and adjusting itself behind the scenes so that you never have to worry about a “pipe heart attack” from a sudden surge.
Quick Reference: Pressure Reducing Valve Specifications
| Feature | Details for Homeowners |
| Common Sizes | 3/4 pressure reducing valve or 2 pressure reducing valve |
| Primary Goal | Reduces high city water pressure to a safe level |
| Standard Setting | Usually factory-set at 50 PSI |
| Top Brands | Watts, Caleffi, Zurn, Honeywell |
| Signs of Failure | Banging pipes, leaking faucets, vibrating sounds |
| Average Lifespan | 10 to 15 years depending on water quality |
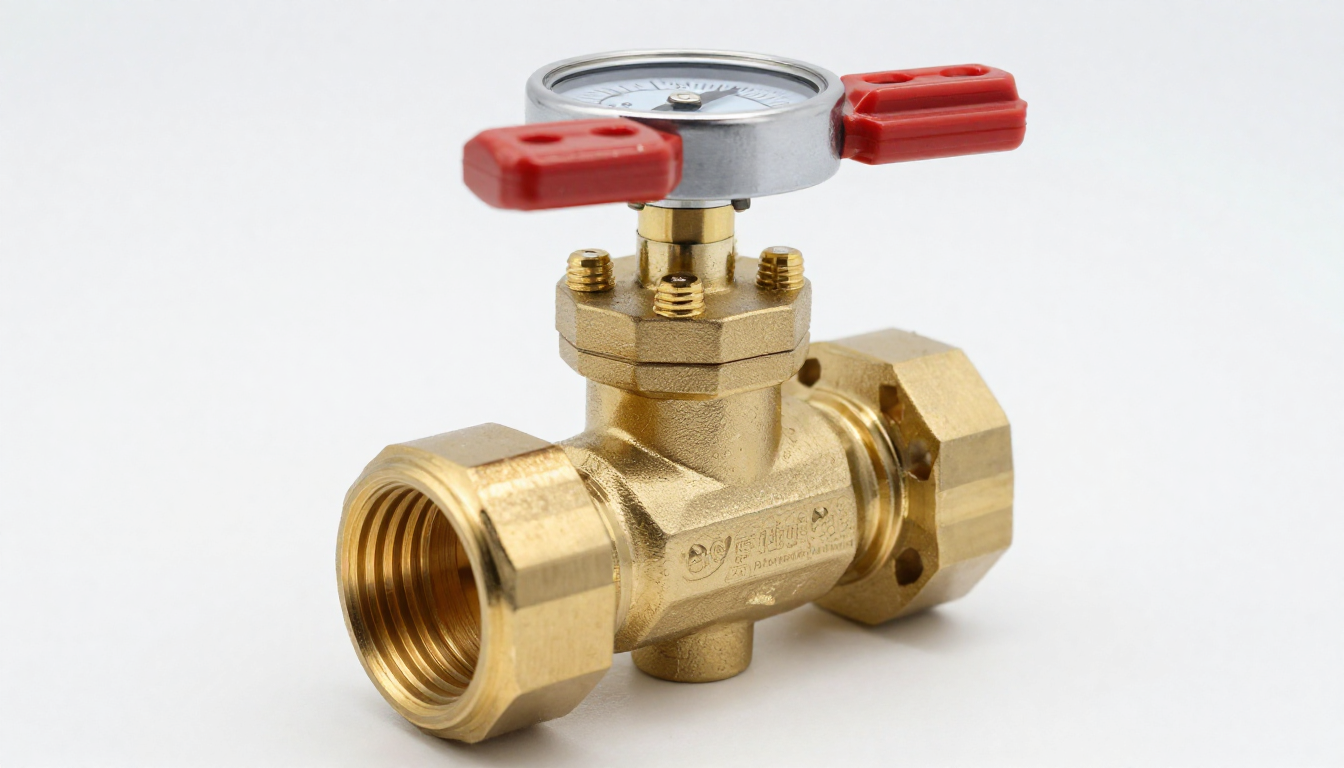
What Does a Pressure Reducing Valve Look Like?
If you go into your basement or look near your water meter, you might see a bell-shaped brass object. So, what does a pressure reducing valve look like exactly? It usually has a wide, rounded top with a large screw sticking out of the very center. This screw is the key to your comfort. Most models, like a watts pressure reducing valve, are made of heavy metal to handle the constant stress of flowing water. It is usually located right after the main shut-off valve where the water enters your house.
Sometimes, a 2 pressure reducing valve might look much larger because it is meant for commercial buildings or very large estates. However, for a standard family home, it is usually small enough to fit in the palm of your hand. You will see arrows on the side of the metal body. These arrows are very important because they tell you which way the water should flow. If you install it backward, the water won’t reach your kitchen sink at all! Always look for that bell shape to identify your valve.
The Step-by-Step Guide: How to Adjust Pressure Reducing Valve
Learning how to adjust pressure reducing valve settings is a great skill for any DIY fan. First, you need a pressure gauge to see your current levels. You should aim for about 50 PSI (pounds per square inch). To start the pressure reducing valve adjustment, find the bolt on top of the bell-shaped housing. Loosen the locknut first so the bolt can turn freely. Turning the bolt clockwise (to the right) will increase the pressure, while turning it counter-clockwise (to the left) will lower it.
When you are figuring out how to adjust a pressure reducing valve, remember to go slowly. Give the bolt just one full turn at a time. After each turn, go to a nearby sink and run the water for a few seconds to “clear” the old pressure. Then, check your gauge again. Many people ask how to adjust water pressure reducing valve settings because their shower feels too weak. Just remember, going above 75 PSI can actually damage your toilet valves and cause your water heater to leak, so stay in the “Goldilocks” zone.
How to Install a Pressure Reducing Valve Safely
If you are handy with a wrench, how to install a pressure reducing valve is a project you can finish in a few hours. First, you must shut off the main water supply to your house and drain the lines by opening the lowest faucet. You will need to cut a small section out of your main copper or PEX pipe. Make sure you choose the right size, such as a 3/4 pressure reducing valve, to match your existing plumbing. Use “union” fittings if possible, which make it much easier to replace the valve later on.
During the process of how to install pressure reducing valve units, cleanliness is key. Ensure there is no debris or dirt inside the pipes, as even a tiny pebble can ruin the internal rubber seal of a caleffi pressure reducing valve. Once the valve is tightened into place, turn the water back on very slowly. Check for leaks around the joints. If everything stays dry, you have successfully protected your home! This simple DIY task can save you hundreds of dollars compared to calling an emergency plumber in the middle of the night.
Common Signs Your Valve Needs an Adjustment
Sometimes your plumbing starts acting weird, and you need to know how to adjust a pressure reducing valve to fix it. If you hear a “thumping” sound when you turn off the water, that is called water hammer. It often means your pressure is way too high. Another sign is a “whistling” sound coming from the walls. This usually means the internal spring is struggling. A quick pressure reducing valve adjustment can often stop these scary noises and bring peace back to your laundry room.
I once visited a friend who thought his water heater was broken because it was constantly dripping. It turns out, he didn’t need a new heater; he just needed a water pressure reducing valve! The high pressure was pushing water out of the safety relief valve. Once we learned how to adjust water pressure reducing valve settings together, the dripping stopped instantly. If your faucets seem to “blast” water the second you touch the handle, your pressure is likely too high, and it is time to grab your wrench.
Comparing Brands: Watts vs. Caleffi
When shopping for a pressure reducing valve for home use, two names come up constantly: Watts and Caleffi. A watts pressure reducing valve is often seen as the industry standard in North America. They are rugged, easy to find at any hardware store, and very simple to repair. Many plumbers prefer them because they have been around for decades. They are the “old reliable” of the plumbing world and are very forgiving if you are just learning how to adjust pressure reducing valve settings for the first time.
On the other hand, a caleffi pressure reducing valve is known for being very high-tech and precise. These valves are often designed to be “dial-up,” meaning they have a little gauge built right into the knob. This makes how to adjust a pressure reducing valve even easier because you can see the setting without a separate tool. While they might cost a little more, the ease of use is worth it for many homeowners. Both brands offer excellent protection, so you really can’t go wrong with either choice.
Understanding Different Sizes: 3/4″ vs 2″ Valves
Choosing the right size is vital for your home’s water health. Most modern houses use a 3/4 pressure reducing valve. This size provides plenty of water for a family of four to run the shower, the dishwasher, and the hose at the same time. If you have a very old house, you might have 1/2-inch pipes, but 3/4 is the standard today. Using a valve that is too small will make your water pressure feel weak, even if the setting is turned up high.
In larger buildings, like an apartment complex or a big office, you will see a 2 pressure reducing valve. These are much heavier and move a massive amount of water. You wouldn’t want a 2 pressure reducing valve in a small house because it wouldn’t be sensitive enough to manage low-flow faucets. Always check the writing on your current pipes before you go to the store. Selecting the right size ensures that your pressure reducing valve adjustment works perfectly and gives you that “hotel-style” shower experience every morning.
Maintenance Tips for a Long-Lasting Valve
A water pressure reducing valve is a “set it and forget it” device, but it still needs a little love. Over time, minerals from the water can build up inside the valve. This is especially true if you have “hard water.” Once a year, it is a good idea to check your pressure with a cheap $10 gauge that screws onto your outdoor garden hose bib. If the pressure has crept up above 60 PSI, it might be time for a quick pressure reducing valve adjustment to bring it back down.
If you notice that your pressure is fluctuating wildly, the internal diaphragm might be torn. Instead of wondering what is a pressure reducing valve repair kit, it is often cheaper and faster to just replace the whole unit. Most experts recommend replacing your pressure reducing valve for home every 12 years. This prevents a sudden failure that could flood your basement. By keeping an eye on it, you ensure that your 3/4 pressure reducing valve continues to be the silent hero of your home’s infrastructure.
Frequently Asked Questions
What happens if a pressure reducing valve fails?
If your water pressure reducing valve fails, it usually stays “open.” This means the high pressure from the city flows directly into your home. You might notice leaking faucets, a running toilet, or a banging sound in the pipes.
How do I know what size I need?
Most homes use a 3/4 pressure reducing valve. You can check the size by looking at the markings on your copper pipes or looking at the side of your existing valve.
Can I install a pressure reducing valve myself?
Yes! If you are comfortable cutting a pipe and using a wrench, you can learn how to install a pressure reducing valve by following a few simple videos. Just make sure the water is off!
Why is my water pressure still low after adjusting?
If you followed the steps for how to adjust water pressure reducing valve and the pressure is still low, your valve might be clogged with sediment. You may need to clean the internal filter or replace the valve.
Is a pressure reducing valve the same as a shut-off valve?
No. A shut-off valve stops the water completely. A pressure reducing valve just slows it down. You need both for a safe plumbing system.
Does every home need one?
Not every home, but if your city water pressure is over 80 PSI, you definitely need a pressure reducing valve for home protection to prevent damage to your appliances.
Conclusion
Protecting your home doesn’t have to be complicated. Now that you know what is a pressure reducing valve and how it keeps your pipes safe, you can take the next steps with confidence. Whether you are choosing a watts pressure reducing valve for its reliability or a caleffi pressure reducing valve for its precision, you are making a great choice for your home’s future. Remember, a simple pressure reducing valve adjustment can save you from expensive repairs and high water bills.
Are you ready to check your home’s water pressure? Grab a gauge and see where you stand! If you find your pressure is too high, don’t wait for a leak to happen. Installing or adjusting your water pressure reducing valve is a quick win for any homeowner.